general sewing · pattern hacks · Uncategorized

One Dress With So Many Possibilities – Using the Rebecca Page Dreamy Drape as a Mini-Capsule on It’s Own

This post may contain affiliate links.  These links in no way change how you would purchase items, the amount you pay, and I do not receive any of your personal information.  For paid purchases, the company themselves may pass along a very small percentage of the proceeds from the sale to me as a thank you for referring.  This really amounts to pennies per purchase, but those pennies do eventually add up and when they do, it helps me to continue purchasing patterns, fabrics, and supplies.  So to those of you that do utilize the affiliate links, please know that I truly do Thank You as you are helping me to continue doing what I love doing.

IMG_3747

I’m sure we’ve probably all seen those infinity wrap dresses and the multi-wrap skirts.  I actually have a few that I had purchased some time ago and happened to be wearing one the other day and had to look up different ways to tie it because I somehow misplaced the paper that came with it.  That got me thinking about other things in my wardrobe, all the talk of mini-capsules and capsule sewing, what things I actually wear and what I could get more wear out of instead of just wearing it during certain seasons….  especially since I really need to do a good overhaul of my wardrobe and get it back to being organized and only with the things I actually do enjoy wearing.   As with most people, space is limited.  And I’m also not one to pack up seasonal wear after a season either – so in the summer you will still see sweaters in my closet (plus, I tend to be cold a lot anyways and like to be able to grab one if I need it…..), in the winter I still have tank tops in my closet because they still make great layering pieces under cardigans and other tops.

So in my search for the ways to tie my skirt that day, I happened to come across one that was a batwing sleeve type dress that they had advertised as a multi-wear dress and I knew instantly what pattern could recreate it – and actually, I already had a couple of the tops in my closet so I first tried out those and tied them in different ways just to see if it would work before I did the dress version.

Using the Rebecca Page Dreamy Drape Top and Add-On Skirt patterns, I was able to recreate the dress and have managed to tie it in several ways to show how you can take this one garment and extend the wear and change it up and wear it pretty much all year long.

Dreamy Drape Top Pattern can be found here:

https://rebecca-page.com/product/ladies-batwing-pattern/?affiliates=211

The Add-On for the Skirt can be found here:

https://rebecca-page.com/product/batwing-dress-pattern/?affiliates=211

IMG_3744

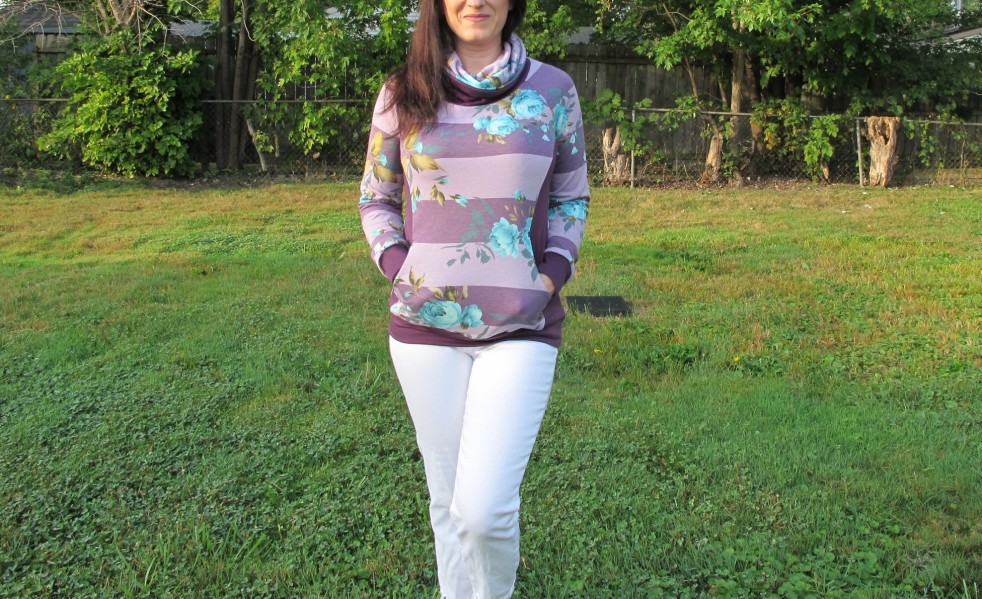
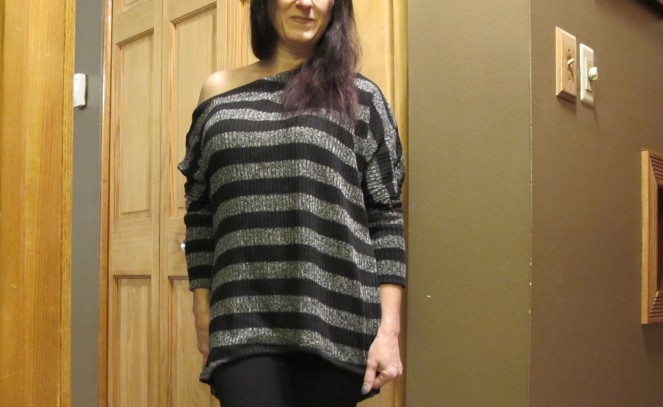
I did the pattern as-in with no modifications.  Long-sleeves, rounded neckline, mini length skirt.

This is how it works up:

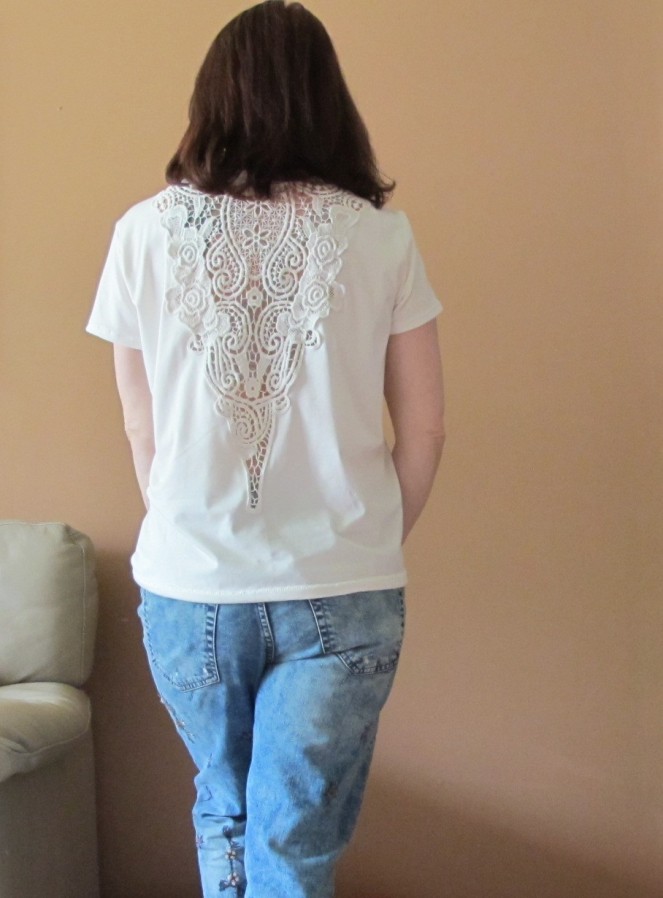
And if you slide the long sleeves up into the top, you can turn it into a short sleeve version with still keeping the long sleeves for when it’s colder.

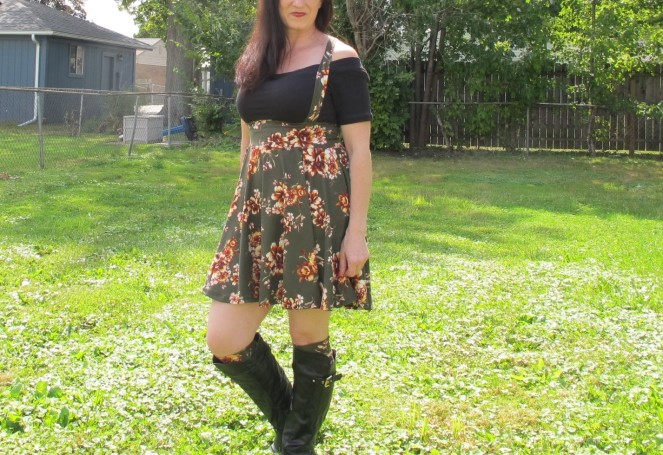
Even if you weren’t interested in any of the other ways you could wear it, the standard version is a great dress for year-round.  Wear it with sandals in the summer, heels, or pop some boots on in the fall/winter and the same dress can look good any time of the year.

Some info about the pattern itself – this took less then an hour to sew up.  I already did have the pattern cut out to my size as I’ve made it previously and this did not count the time actually cutting the fabric.  But less than an hour of actual sewing time and that includes hemming, so it’s a very quick and easy sew.  A beginner could easily complete the project – the instructions are detailed enough that you can follow-along even if you aren’t familiar with garment sewing.  For more experienced people, you’ll be able to whip right through it.

I’m sure there are so many more ways to wrap and tie the dress, but these should give you some ideas of the different ways you could wear this, and then even do some searches or come up with your own ways too.  These were just some that I came up with quickly off the top of my head:

You can easily do a one shoulder/sleeve style and it gives a nice drape in the front too.  All I did here was to pull the neckline down under the one arm, take the sleeve and pull it across the front and tuck it in the other side at the shoulder.  You can also have the one sleeve still on as a long or short sleeve by just leaving your long sleeve or tuck it in like pictured for a short sleeve version.

Or do a drape front halter (this one is actually one of my favorite ways to tie it….).  Just slide the neckline down under your arms.  Take the sleeves and pull them up around the back of your neck and tie.  Super quick and easy but it gives it such a nicely draped front.

I love this way too – with the neckline pulled down under the arms, just tie the sleeves around the waist for a mock-wrap look.

I’m not a “bubble-dress” wearer, so I personally probably won’t wear it this way, but I know some people love the bubble type dresses and it’s easy to achieve with this same dress – instead of tying the sleeves anywhere, just tuck them to the inside of the top – it gives a nice bubble style and also a sort-of mock pocket too!

Another halter style – instead of doing the draped style front, take your sleeves and cross them in front and then tie them around your neck for another fun neckline.

IMG_3760

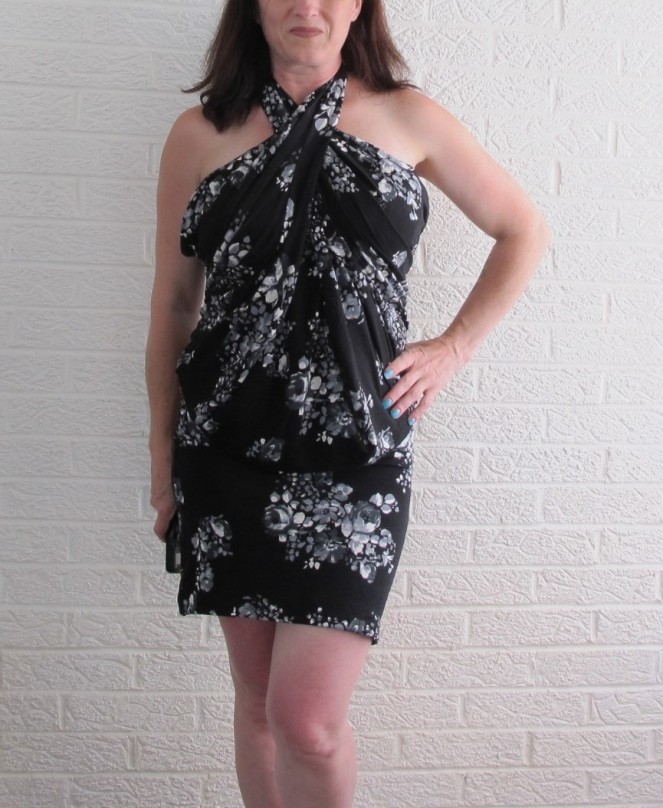
Or, if you like the standard halter but didn’t want so much drape in the front, you can easily just pull the sleeves up tighter from the front around your neck and it gives you the halter without so much drape.

IMG_3764

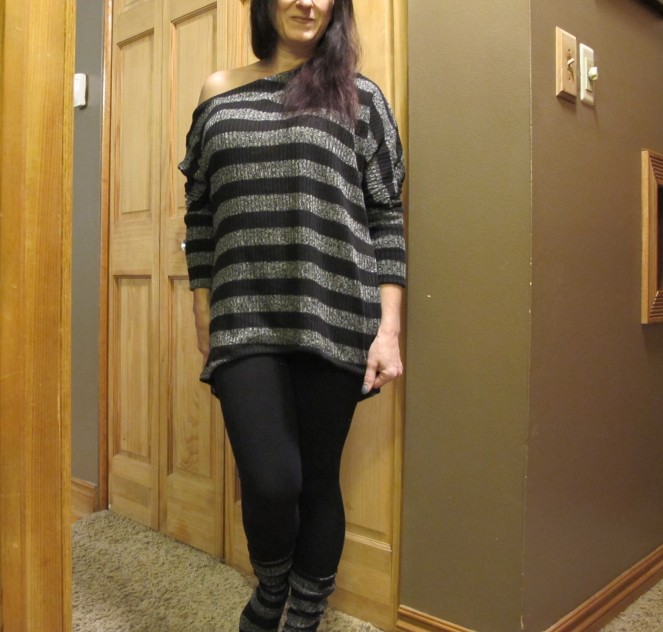
But you don’t just have to keep this as a dress either – all of the styles can also be done as just a top instead.  Just tuck the skirt part inside and you’ve got a top and can do all of the different dress necklines in a top version instead.  Or, if you didn’t want a dress at all, you can just make the standard Dreamy Drape top and do these options to expand the ways to wear it –

And if we really want to get crazy, we can even just use this as a skirt too –

These were just a couple of quick variations I did – tying the sleeves around the waist gave it a mock wrap look.  Tied in the back around the waist gives it a more fitted look.  Tuck the sleeves in for a bubble look with mock pockets.

There are just so many ways to wear this one garment that it’s like it’s own little mini capsule!

Because it’s such a quick sew and since I can wear it so many ways, I think I’ll have to make a couple more of these dresses while I still have the pattern out and ready!

Pattern Info:

Top:  https://rebecca-page.com/product/ladies-batwing-pattern/?affiliates=211

Skirt Add-On:  https://rebecca-page.com/product/batwing-dress-pattern/?affiliates=211

Fabric Info:  The fabric I used for this version is a poly/spandex blend that I had purchased some time ago during one of the sale from Fabric Mart.

It’s kind of crazy to think that you can get so many different looks from one dress….. it’s just a matter of tucking/pulling/pushing fabrics into other areas to get the desired outcome, like using the sleeves for a halter neckline, or just tying the sleeves for a mock wrap look.

As always, thank you for hanging out with me and here’s to hoping you have a Sewtastic Day!


general sewing · Uncategorized

Father’s Day Sewing with Sinclair Patterns and a Bonus Boy’s Ellie and Mac Be Active Shorts

This post may contain affiliate links.  These links in no way change how you would purchase items, the amount you pay, and I do not receive any of your personal information.  For paid purchases, the company themselves may pass along a very small percentage of the proceeds from the sale to me as a thank you for referring.  This really amounts to pennies per purchase, but those pennies do eventually add up and when they do, it helps me to continue purchasing patterns, fabrics, and supplies.  So to those of you that do utilize the affiliate links, please know that I truly do Thank You as you are helping me to continue doing what I love doing.

I realize that not everyone celebrates Father’s Day, or have men that they sew for.  We do celebrate and on my side alone, that means gifts for the hubby, my father, my step-dad and for my father-in-law.  And as I’m sure we’ve all experienced, some people appreciate your hard work when you make them something, and some people just don’t.  Over the years I’ve learned who the work is worth it for and who isn’t and I’ve become pretty selective now on who will get things I’ve made and who just gets the standard gift or gift card.

In addition to the “who appreciates it” fun, I also have a very picky hubby.  It’s a funny thing because he is in amazement at my skills and truly my biggest fan, but….. when it comes to the things he actually WEARS, he’s very picky.  I’ve made many things that he just “loved” and admired and talked up when he got them, but only to see that they never actually got worn.  I didn’t take it personally because honestly, I know he appreciated all the work, and when you think about it – how many times have we spent a lot of time and effort into something for ourselves and then either decide it doesn’t fit right or we don’t really care for the style or something and it never gets worn?  So, I get it.  And I was almost at a point of saying I’m just not making him anything unless it’s something he specifically asks for.  So, this is all just a long way of saying – if they don’t wear it, don’t take it personally – and keep trying – it may be that you just haven’t found the particular pattern that fits them the way they like!

I already knew that I was going to make some new t-shirts for the hubby because I did happen to find a pattern (after trying several others….) that he actually WEARS, but with summer coming up, I knew he was going to be needing some new tank tops too.  Luckily I ended up seeing the same designer had a men’s tank pattern too, so since I knew he loved the fit and everything of their styles, I went ahead and purchased it.

These are the patterns I used for the Father’s Day sewing for the hubby and my step-dad:

https://sinclairpatterns.com/product/kai-semi-fitted-crew-neck-t-shirt-pdf-sewing-pattern-for-men/?tm=shellyt420

https://sinclairpatterns.com/product/rocky-semi-fitted-knit-tank-with-optional-panels-and-a-hood-for-men-pdf-sewing-pattern/?tm=shellyt420


The Kai t-shirt pattern is a basic style t-shirt.  Super quick and easy sew too.  These are the ones I made for the hubby and step-dad:

The Rocky is a great tank top style.  I did the basic one for all of mine this time around, but I am looking forward to trying out the other options like the color-blocked sides and hood.  It works up quick and easy.  The fit and styling is spot-on.  And I love the fact that even in the men’s versions of the Sinclair patterns there are separate drafting files for regular, short and tall.  I will say I have used a lot of different pattern companies and the Sinclair ones remain one of my absolute favorites.

Here is the Rocky worked up in several different fabrics:

Since my step-dad doesn’t live in the same state, I did have to mail his package off to him.  He got it yesterday and the text I got was – I had no idea you made these until your mom told me!  The fit is perfect – love them!  So, needless to say – they were a big hit (he got a mixture of the t-shirts and tanks).  Huge compliment, especially since him and my mom are generally all about that designer logo…..

Honestly if you haven’t tried Sinclair Patterns either for yourself or the men’s, you really should – the drafting is great, patterns and instructions are very detailed and the fact they come with separate drafted files for regular/petite/tall shows that a lot of thought goes into how the final fit is going to be for everyone.

https://sinclairpatterns.com/product/kai-semi-fitted-crew-neck-t-shirt-pdf-sewing-pattern-for-men/?tm=shellyt420

https://sinclairpatterns.com/product/rocky-semi-fitted-knit-tank-with-optional-panels-and-a-hood-for-men-pdf-sewing-pattern/?tm=shellyt420


I used a variety of fabrics for the tshirts and tanks I made.  There’s jersey knit, rayon spandex, ribbed rayon blend, etc…  I have a habit of buying scrap boxes a lot…  lol!!  But seriously, sometimes on a budget even though you don’t get to pick your fabrics for a scrap box, it’s so worth it.

Sincerely Rylee often offers $7.00 scrap boxes…. it’s a medium sized flat rate box of “scraps”.  The variety ranges from small pieces to large pieces – a few of these shirts came out of ONE scrap box and there’s still fabrics in the box to do a few other things.  So, this is one of those times that I say that sewing actually is a lot cheaper then retail shopping since I was able to get a couple men’s shirts out of ONE box and I can still make several more things for myself, so you are looking at it maybe costing about $1-$2 per item!  They don’t always have scrap boxes, but when they do, grab them – and if they don’t at the time, their regular prices are pretty good too –  this is a referral like to the site

http://rwrd.io/8wymaw0

I also often get my fabrics from Knitpop.  They have a great clearance section and a rewards program.  They have scrap boxes too, but they are a little pricier (but worth it – there’s a ton of great usable fabric in them and no small pieces!).  They often put other boxes on sale – for instance, the shirts and tanks that were not made with the Sincerely Rylee scrap box were made with a Knitpop black/gray scrap box that was on sale for $15.00 – and you guessed it, in addition to the shirts, there’s still more in my scrap box to make a few more things too!   If it’s your first Knitpop purchase, make sure to sign up for the rewards program BEFORE checking out – I believe there’s a bonus you can use immediately for your first purchase.  Link to Knitpop –

http://bit.ly/2lV0c4P

So, Father’s Day sewing out of the way I decided to try out that new Ellie & Mac Be Active Shorts for my son.  They matched a pair that he recently insisted he had to have at the store that cost what I consider to be a small fortune for a pair of shorts just because they have this little jumping basketball player logo on them! Lol!  The problem is, at his age, he’s right at the very end of the kids patterns and moving into the adult size instead….. and as of right now there’s no adult Be Active shorts pattern (Hint, Hint Ellie & Mac – there’s a big need for this in an adult sizing! Lol!).  In all honesty, I generally wouldn’t even have tried the kids sizing just because he’s so close to the end of the size chart and if anything is slightly smaller, he won’t wear it.  But…. the pattern was on a release sale price and pretty cheap, so I decided to give it a try:

Kids Be Active Shorts Pattern

First thing – it’s a quick and easy pattern that’s for sure.  If they were the tiniest bit tighter, my son wouldn’t wear them, but I lucked out and they fit great for right now until he goes through another one of those darn growth spurts (slow down kid – you are already taller then me!).  It’s the cute styling with the different accent bottom.  And don’t be intimidated by that – it’s honestly super easy to do.  Elastic waist-band pull-on style shorts.  The only thing I noticed immediately was – NO POCKETS….. and according to my son, any shorts or pants without pockets will not get worn because they are useless.  So I did add some inset pockets to the pair I made for him.  I just used a pocket pattern piece from another pattern.  He really likes this pair and said they are just like and just as comfy as his store-bought ones.  So for now, they are a success….  and hopefully there will be an adult version of the pattern soon because he’ll outgrow these before the end of summer and also because once the hubby sees them, he’s going to want some himself too! Lol!

I just figured I’d toss the Be Active Shorts pattern in here too just because I had just made them as a trial and it fits with boys/men’s sewing and in case anyone wanted to see what they turned out like on the largest kid sizing.

To sum it all up:

So just remember, don’t get discouraged if someone likes stuff you made but doesn’t actually wear it.  It could be just like my hubby – it just takes finding the right pattern company with a fit that he likes, and it could take a little trial and error doing so.

Here’s all of the links for today’s things so you don’t have to scroll all the way back up to try to find the patterns or fabric if you were interested in getting any of them:

T-shirt:

https://sinclairpatterns.com/product/kai-semi-fitted-crew-neck-t-shirt-pdf-sewing-pattern-for-men/?tm=shellyt420

Tank Top:

https://sinclairpatterns.com/product/rocky-semi-fitted-knit-tank-with-optional-panels-and-a-hood-for-men-pdf-sewing-pattern/?tm=shellyt420

Kid’s Shorts:

Kids Be Active Shorts Pattern

Sincerely Rylee (Fabric):

http://rwrd.io/8wymaw0

Knitpop (Fabric):

http://bit.ly/2lV0c4P


Thanks for hanging out with me today – and here’s to hoping you have a Sewtastic Day!

general sewing · pattern hacks · Uncategorized

Making Some Adjustments to the Ellie & Mac Vacation Romper and Removing Some Bulk

This post may contain affiliate links.  These links in no way change how you would purchase items, the amount you pay, and I do not receive any of your personal information.  For paid purchases, the company themselves may pass along a very small percentage of the proceeds from the sale to me as a thank you for referring.  This really amounts to pennies per purchase, but those pennies do eventually add up and when they do, it helps me to continue purchasing patterns, fabrics, and supplies.  So to those of you that do utilize the affiliate links, please know that I truly do Thank You as you are helping me to continue doing what I love doing.

This is the pattern we will be working with:

To give some basic pattern info – a beginner can easily complete this project – with or without the adjustments I’ll be mentioning.  It’s a simple design – front and back are exactly the same.  Binding for the arm/neck.  It works up quite quick.  Since it’s a very relaxed fit, you don’t need to worry a ton about exact sizing, grading and all of those things – just go by your measurements and pick the size that seems like it will be best suited for you.  I know, I know….. you are always told to grade, grade, grade….. but seriously, with something relaxed like this, it really doesn’t make much sense to spend the time doing it unless you are way different in sizing for the bust compared to hip areas.  It’s a pull-on romper with a ton of ease – you literally step into it and pull it up…. no zippers, elastic, or anything like that.

Now, being perfectly honest, I’m not a huge romper wearer at all….  don’t get me wrong – they are adorable and they look so great on everyone I see them in, and I have made a couple.  But I realized that I tend not to wear them because I’m lazy and don’t feel like having to pull everything down and back up and adjust everything just to go to the bathroom several times a day.  But, I purposely made this one for a music festival we were planning on going to because of the attire generally worn and the comfort.  Ironically, the weather was horrible the weekend of the event, and it being an outdoors event we ended up not going.

So, on to the reason why you are really here…..  you were probably debating on the Vacation Romper pattern, but being short/petite, you weren’t sure how it would look.  I was the same way – I actually thought the pattern was perfect for the event we were going to, but with so much bulk on the sides I was worried that being short (I’m 5’1 for reference), I was concerned that those large sides were going to overwhelm me.  I decided to buy the pattern and see if I could get it to still have the same harem/baggy side look while still being petite friendly and I think it came out pretty good….  either way it’s pretty darn comfy for lounging around the house! Lol!

The first thing I had to do was to take some length off of the pattern because I’m quite a bit shorter then what the pattern is drafted for.  Anyone on the shorter side can feel my pain because we quite often have to do this.  There is a shorten/lengthen line on the pattern towards the bottom and instructions on how much to remove based on your height.

If you have your pattern all taped together, you will notice that the side is a large triangle, which is what is going to give the romper all that draping volume on the sides.  This was the part that was concerning to me as it was just a lot going on for a petite frame.  I still wanted drapy, but not so much….  What I ended up doing was quite simple – I just basically eliminated the triangle.  Still wanting the harem drape sides, I didn’t want to cut straight down, so I figured out where triangle piece would basically start protruding, and folded it out of my way and instead of the triangle, I cut closer to the folded in pattern piece having it straighter instead (I still cut a slight curve so it wouldn’t be completely straight down).

IMG_3505
I can’t show the whole pattern, but I am showing the area of concern so you have an idea off what I’m talking about.  Instead of going straight down now, I cut the top of the pattern with no modifications and when I got to the area I had folded in to get out of my way, I just cut a slight curve there instead until I got back to the bottom where I would cut the remainder of the piece normal.

After wearing the romper, I can say there’s a good chance that had I not taken that volume out of the sides, I would have more than likely tripped or caught myself on things many times throughout the day! Lol!

Here’s the finished result:

It still has the feel and most of the original Vacation Romper look, just a lot more petite friendly and not so overwhelming (at least in my opinion).


Best of all, it saved quite a bit of fabric by doing this little adjustment and I was able to get this one out of some super soft baby french terry I got in a scrap pack!

Fabric was from here:  http://bit.ly/2lV0c4P

Pattern can be found here:  https://www.ellieandmac.com/products/womens-vacation-romper-pattern?aff=208

So, if you’ve been debating on the pattern for the same reasons I did, hopefully this will give you a little idea of some adjustments you can make.

Thanks for taking the time to hang out with me today and here’s to hoping you have a Sewtastic Day!

general sewing · pattern hacks · Uncategorized

Adding a Little Extra to the Free Rebecca Page Toronto Tee

This post may contain affiliate links.  These links in no way change how you would purchase items, the amount you pay, and I do not receive any of your personal information.  For paid purchases, the company themselves may pass along a very small percentage of the proceeds from the sale to me as a thank you for referring.  This really amounts to pennies per purchase, but those pennies do eventually add up and when they do, it helps me to continue purchasing patterns, fabrics, and supplies.  So to those of you that do utilize the affiliate links, please know that I truly do Thank You as you are helping me to continue doing what I love doing.

Rebecca Page Patterns recently released a Toronto Tee pattern for FREE –

https://rebecca-page.com/product/ladies-tshirt-sewing-pattern/?affiliates=211

So, of course, I needed to sew it up right away – I mean, who doesn’t need a few more t-shirts, right?!

The pattern itself is a quick and simple sew.  Standard front, back, sleeves, neckband.  It should be mentioned though that the fit of this shirt isn’t a fitted style t-shirt – it’s a loose, boxy styling.  With that said, you are going to want to consider your fabric choice when making the top.  Anything structured like a cotton lycra is going to hang differently and accentuate the boxiness, where anything with some good drape like a rayon spandex, bamboo, ity are all going to drape a lot nicer.

The shirt works up really quick.  There is a front pocket option too that you can put on or leave off.

I did this one in an ity fabric and did the front pocket:

Then a solid one without the pocket:

IMG_3420 (2)

But then I had an idea pop into my head that I just had to try:

And boy do I LOVE the way it worked out!  I decided to add a little something extra to the top and did an open lace back to it.  I had this lace embellishment already, and I already had the top done, and I had this idea that was not going to leave my head until I at least tried it out.

So, I took the top, laid it out on the floor, laid my lace embellishment piece on it where I thought I’d want it and started pinning like crazy.  I made sure the top of the lace piece was going to be sewn in the same place that my neckband sewing was already done just so everything would line up nicely and it wouldn’t look like an afterthought (even though I’m sharing with you that it really was! lol!).  Carefully pinned all the way down and around the lace piece and then slowly sewed it onto the back.  At this point I really debated on just leaving it as a lace overlay or if I wanted the open lace back look, so I tried it on a couple times and although I think it would have looked great either way, I decided to really spice it up and open that back area.  Super easy – the fabric isn’t going to fray, I’ve done some great stitching so nothing is going to pull out or anything, so I flipped the shirt inside out, did a little snip in the center (being very careful to only cut the fabric and not cut into the lace piece) and then just carefully snipped away the fabric close to the stitching (but not cutting into the actual stitching) all the way around the inside of the lace piece.  That’s it…. nothing too fancy or complicated – just a tad bit time consuming with the pinning, slow stitching around the piece and then the slow snipping so you don’t cut into your actual lace.

And this is the end result:

IMG_3414

When I first started sewing the original top, I wasn’t quite sure how I was going to like the boxy style fit….  it’s just not something I’m generally drawn to.  Even after sewing up the crazy print one, I still wasn’t completely sold on it – I mean, I love that top in particular just because it’s so fun and funky and I knew I’d wear it, but I wasn’t sure that I’d end up making more.  I’m glad that I tried it out again and did something a little different with it.  Honestly, I don’t know that I would have actually worn the solid top if I left it alone, but now I know I’m going to be wearing it quite a bit.  It actually gave me a little more excitement about this pattern too because I’m thinking about other little hacks that could be fun – like just adding some fun embellishments without open back and things like that because the top is a great base for doing some fun things.

And this one I added an embellished front –

For this one, the applique was a premade piece (all these tops and lace/appliques were from the same place that will be listed below).  Before sewing the top together, I pinned my applique to the front piece and slowly sewed around the entire applique, then put the top together.  I know “skulls” aren’t quite everyone’s thing, so I completely get if you aren’t a fan of this top, but I’ve gotten so many darn compliments on this one it’s a little crazy – almost makes you not want to wear it out in public because I’ve been stopped several times asking about it! Lol!

If you aren’t sure you’ll like the style/fit, I’d say it’s a free pattern – give it a try.  Not really much to lose if you aren’t thrilled at the end because really you end up with a top either way – if you don’t care for how it looks, use it for a pj top! Lol!  But just know that you can easily spruce it up with a couple little embellishments or fun details too and do something a little different that may make you like something that you really didn’t think you would.

If you haven’t grabbed your free pattern yet, it can be found here:

https://rebecca-page.com/product/ladies-tshirt-sewing-pattern/?affiliates=211

The fabric for all of these tops, the back lace piece, and the skull applique were all from here:

http://bit.ly/2lV0c4P

If you haven’t shopped at Knitpop for fabric before, they ship super quick, they have a great clearance section and often run some good sales, and BEFORE you place your first order, make sure to sign up for their free rewards program – it adds up quick, especially if you like to stock up on fabrics during sales and stuff.

Thanks for hanging out with me today and reading along to my ramblings.  If nothing else, hopefully I’ve sparked a little of your own creativity and got some ideas going with things you can do to either this or any other top pattern just to make it more of your own and something you are really going to enjoy wearing!

Have a Sewtastic Day!

general sewing · pattern hacks

Lounging Around in a Comfy Robe and Some Double-Duty Regular to Lounge Wear Patterns

This post may contain affiliate links.  These links in no way change how you would purchase items, the amount you pay, and I do not receive any of your personal information.  For paid purchases, the company themselves may pass along a very small percentage of the proceeds from the sale to me as a thank you for referring.  This really amounts to pennies per purchase, but those pennies do eventually add up and when they do, it helps me to continue purchasing patterns, fabrics, and supplies.  So to those of you that do utilize the affiliate links, please know that I truly do Thank You as you are helping me to continue doing what I love doing.

So, I broke my wrist falling on some ice in January, so I haven’t been doing much sewing…. the first 6 weeks I did none, but when they had to put a 2nd cast on, I was told it was ok to do some light stuff with the hand, so of course I needed to try sewing again.  But the time off from doing things really gave me time to think about patterns, fabrics, what I use and what I wear.  I also managed to print off quite a few patterns I had purchased but never got around to sewing.  So to keep it simple, I’ve got quite a few things planned so hopefully you’ll see a lot more posts coming shortly although I’m sure it is going to be slow going for a little while since I still have the cast as of now and when it does come off I’ve already been told it’s going to need therapy and all of that fun stuff… ugh….  but it does feel so good to be able to create again, even if it’s a lot slower than I am used to!

So on to why you are really here – you wanted to hear about the robe or lounge wear, right?!  Well, I tried out the new Rebecca Page Relaxation Robe Pattern –

https://rebecca-page.com/product/adults-bathrobe-sewing-pattern/?affiliates=211

Yes, the pattern is easy enough to complete that you can do it with a wrist cast on… lol!  In all honesty, the pattern is straight-forward and easy.  A beginner could easily do it with the instructions the way they are written.  I did add the inside hanging loop and pockets, but you don’t have to do those options – it’s your robe and your preference.  The pattern itself goes together very well, has a large size range (adults and kids too, so you can make them for your whole family!) and is a unisex pattern.  It does take quite a bit of fabric, but that’s to be expected with any type of robe.

I’ve seen quite a few versions on the Facebook page in all different fabrics, so it seems to work well with almost any knit fabrics.  I made mine out of french terry fabric so it would be nice and cozy to toss on after showering.  This works up pretty quick without any major difficult areas – so it makes a great pattern to keep on hand for when you need to make someone a last-minute gift too!

https://rebecca-page.com/product/adults-bathrobe-sewing-pattern/?affiliates=211

The robe pattern just happened to go with a theme I was already working on prior to my accident – pajamas/lounge wear.  I’ll admit – I love pajamas/lounge wear.  But I realized that for a few reasons, I don’t really have many patterns for actual lounge/pajamas… Sometimes it’s financial, sometimes it’s the thought that most of them seem similar so I have to already have something that I could use, and sometimes it’s just because I don’t feel like printing/taping/cutting a new pattern (especially when I realized how many I already own that I haven’t sewn up yet – not to mention the ones I’ve purchased and haven’t even gotten printed yet!).  And sometimes it’s just because something I make that is “regular” wear is comfortable enough that I’d wear it for lounge wear too, or sometimes it’s just because you happen to see something and know you can recreate it with a pattern you already have, like what happened here.

IMG_0367

This is actually the Rebecca Page Olivia Top pattern –

https://rebecca-page.com/product/ladies-peasant-top-sewing-pattern/?affiliates=211

The pattern is a top pattern and is designed for knits or wovens.  I happened to be watching an old episode of Sex In The City and Carrie was wearing this white lightweight, short, flowing style nightgown and I instantly thought of the Olivia.  Mine isn’t lightweight because I happen to live where it gets cold, and when I made this, it was chilly, so I needed something a little warmer.  After wearing this one though, I do think I will make a couple in a lightweight fabric for the summer too.  This one was actually made with a flannel sheet that I repurposed as it wasn’t being used any longer.

I had already made this pattern, so I knew how it fit (there’s a post about this pattern too if you are looking to learn more about it) and knew it’s a pretty quick and easy sew.  The only modification that I needed to do was add some length so that the top would become a nightgown – to do this, all I did was figure out where the actual top pattern landed, measure to where I wanted it to fall as a nightgown and added that length to the middle of the pattern.  Then all you need to do is sew it up just as the original pattern instructions state.

So quick and easy and it’s so darn comfortable too!

https://rebecca-page.com/product/ladies-peasant-top-sewing-pattern/?affiliates=211

A lot of my lounge wear consists of tops/pants.  And in all honesty, since breaking my wrist, I’ve been wearing a lot of easy pull-on pants and cami type tops with a large top over just because certain things are easier to put on, pull up/down, etc. with the cast.  So, if I’m not going anywhere right now, I’m generally in some of my pj/lounge wear and the things I’ve been wearing the most –

https://rebecca-page.com/product/camisole-sewing-pattern/?affiliates=211

https://rebecca-page.com/product/stretch-pants-pattern/?affiliates=211

IMG_1656

I’m pretty sure I’ve posted about the Rebecca Page Pippa Pants and Strappy Cami Top, but I’m pretty sure I haven’t posted about them together yet.  In case you haven’t already thought about it, they go perfectly together to make a nice lounge wear set!  This set is done in a really cheap rayon spandex fabric.  I love both patterns separately and have made each of them several times, but just happened to decide to make them at the same time in this fabric I was just trying to use up and determined that together, they make such a great pj set!

I actually didn’t do any modifications to either pattern to turn this into a pj set – just make the patterns as-is in a fabric you would consider pj’s and you are good to go!

Sorry no modeled pics of these only because I didn’t get around to photographing them before the wrist issue, but if you are looking for some fit pics, just check out the prior blog posts on the patterns themselves.  I generally wouldn’t completely do everything in the same colors – I just happened to have a bunch of this fabric, otherwise I would have done the cami straps and the pants waistband in a corresponding color just to break up the print, but they are just pj’s… and I just wanted to use this up! Lol!

Seriously though, both of the patterns are great ones to have on hand anyways – I wear cami tops a lot and this one has already been used a ton.  The Pippa Pants can easily be dressed up or down, so I already have several pair of them in different fabrics, so it’s a very easy transition to making them in different fabrics to wear to bed too!

https://rebecca-page.com/product/stretch-pants-pattern/?affiliates=211

https://rebecca-page.com/product/camisole-sewing-pattern/?affiliates=211

So, a long post to basically say – you can easily think about the patterns you already have to see if you can make it into some comfy lounge wear too – make those patterns you already purchased do some double-duty and really get your money out of them!  And if you are looking for a great new robe pattern, I do recommend the new Rebecca Page one

https://rebecca-page.com/product/adults-bathrobe-sewing-pattern/?affiliates=211

as it’s really like a standard robe you’d have to go out and purchase, but so easy to make!  And I love the idea that there are so many sizes – because being petite and small, a standard “one size fits most” is always way too big on me, so now I can have a robe that actually fits like a robe should instead of dragging on the ground and being swallowed up by the thing!

If nothing else, hopefully this post will help you re-think some of your patterns and help you get creative with filling some of those pattern gaps and seeing what you can do with your patterns other than just what they were originally intended for.

As always – thanks so much for taking time out of your day to hang out with me today!  Hopefully you’ll be seeing more of me around soon as I begin healing and am able to sew and type easier….

Uncategorized

Rebecca Page Strappy Cami – A Staple Wardrobe Piece

This post may contain affiliate links.  These links in no way change how you would purchase items, the amount you pay, and I do not receive any of your personal information.  For paid purchases, the company themselves may pass along a very small percentage of the proceeds from the sale to me as a thank you for referring.  This really amounts to pennies per purchase, but those pennies do eventually add up and when they do, it helps me to continue purchasing patterns, fabrics, and supplies.  So to those of you that do utilize the affiliate links, please know that I truly do Thank You as you are helping me to continue doing what I love doing.

https://rebecca-page.com/product/camisole-sewing-pattern/?affiliates=211

Ok, I’ll first start by saying that I had absolutely no idea that this was going to be a “members only” type of pattern when I signed up to test it.  I wasn’t informed there would be no way to purchase it without doing one of the membership things, so that’s a tad annoying to me…..  sorry, I do love the Rebecca Page patterns, but I’m not a fan of “membership” type things.  I get it – it makes sense from a business standpoint, but I do think it should have been stated up-front so that people could have chosen whether they were going to want to test and promote it that way because now for me to promote the pattern (as part of the testing commitment), I basically have to promote a membership.  That being said, it is such a good pattern that I thought I should at least do a post about it and if anyone wants it, just know that it is one of the membership patterns.  BUT – I will say, there is a one-month membership option and with that, you would get the Strappy Cami pattern for FREE AND be able to chose another pattern too, so if you do the 1-month option, then it would totally be worth it!

I know the membership deal was just started, so I really can’t say how many patterns or what type of patterns are going to be released as this members-only type of thing.  I will say though, with the one-month option, if you are unsure and don’t want to commit, but there’s a members only pattern you are wanting, it would be worth it just to do the one-month commitment (one payment just like if you were purchasing a pattern itself), get that free members only pattern and chose another one, so really, that option does make it a good deal.  But, honestly, with the program being so new, and no real information as to the amount or type of patterns that would be being released monthly, I can’t really comment on how good of a deal any of the longer memberships would be.

So, if you are on the fence as to whether you want to sign up for this membership deal, I’m not going to be too big of a help other than to say, you could easily try it for the one month and not have any actual commitment and just wait it out to see if in the upcoming months there are things that would make it worth it for you to sign up for a longer one.

If you were thinking about this particular pattern and weren’t quite sure if you wanted it yet or not, that’s more-so what this post is for.  I’ll give you a little info about the pattern itself so then you can make your decision.

https://rebecca-page.com/product/camisole-sewing-pattern/?affiliates=211

For me, a camisole is a wardrobe staple – I wear them year-round.  I wear them for layering, under cardigans, sometimes under sweaters, heck, I even wear them to bed too – pair it with some cute pj shorts and pants and you are all set!  Lol!  And honestly, I’ve never made a camisole before – it’s one of those things I just generally purchase because you can get them so darn cheap.  But honestly, after making a few of these, I don’t think I’ll ever purchase another one again.  They go together so darn quick, and take so little fabric!  Besides, you can make them in any prints you want – or a ton of solids too!  I’m doing the post for the ones already done, but I have several more already cut out, and I’m even experimenting with adding bra straps instead of doing the binding straps, which looks like it’s going to come out really good – just no pics yet of the finished ones!

There is a large size range for the pattern.  There’s the plain front, which is a standard style cami, or there’s also a ruched style front too.   You can use your fabric for the binding that goes across the front/back/straps, or you can use fold over elastic too.  These things really take no time at all to make and I’ve been able to make mine easily with 1/2 yard and that even leaves me enough to do a matching set of undies too!  I’ll save you from having to look at the pictures of the matching sets since I did a matching undie for each of the ones you’ll see! Lol!

Can a beginner complete this?  Definitely!  I don’t see any areas that would be difficult at all for even a beginner to make ones of these.

This pattern is for stretch knit fabrics and seems to work well in most that I’ve tried so far.  I’ve used double brushed poly and cotton lycra so far.

So, if a cami is something you wear a lot and have been debating on possibly making your own, this is definitely a good pattern for it.  I found the sizing to be great and it’s so quick and easy to make.  All of mine were made with fabric left-over from other projects, so it’s great for using up some of those pieces you aren’t sure what to do with too.

Just know – it’s one of the members only patterns, so you will need to sign up for at least a 1-month membership in order to get the pattern – signing up gives you the pattern free and also allows you to pick another pattern.  I just wanted to point that out again since I wasn’t aware there would be no way to just purchase the pattern without doing the membership.

https://rebecca-page.com/product/camisole-sewing-pattern/?affiliates=211

Thanks for taking the time to hang out with me today and here’s to hoping you have a Sewtastic Day!

general sewing · Pattern Tests · Uncategorized

Ellie and Mac Ruched Tee – A great wardrobe extender with all of the options!

This post may contain affiliate links.  These links in no way change how you would purchase items, the amount you pay, and I do not receive any of your personal information.  For paid purchases, the company themselves may pass along a very small percentage of the proceeds from the sale to me as a thank you for referring.  This really amounts to pennies per purchase, but those pennies do eventually add up and when they do, it helps me to continue purchasing patterns, fabrics, and supplies.  So to those of you that do utilize the affiliate links, please know that I truly do Thank You as you are helping me to continue doing what I love doing.

When I saw the tester call for this one, I thought – oh, that’s cute – I’d make one, not really thinking I’d make several, but just that it’s something I’d periodically wear so make one or two.  But now that it’s done, I’m ready for so many more!
The pattern itself is very quick and easy to complete.  It’s for knit fabrics.  A beginner can easily complete this.  I really can’t think of any areas that even a beginner would run in to any issues – the instructions are detailed and have pictures, so even if you aren’t sure on construction of any particular area, it’s still easy to follow along.
The version I did is a relaxed style fit so it’s not extremely tight.  But the pattern is packed with options, which is why after making it, I decided I need so many more in my wardrobe.  Honestly, to wear as a regular shirt, it’s great, but after doing it, I realized this is going to be an amazing work-out/yoga shirt too!  The pattern has different fit options – relaxed, fitted (which is going to give you a slightly more fitted style look) and then slim which is going to be a very fitted style.  On top of that, you can wear the ruched side in the front or back, which really can change the look up too – it’s like getting 2 tops out of 1!

And if that wasn’t enough to convince you – mine is the short sleeve option.  But the pattern actually has a sleeveless (tank option), short sleeves, and even long sleeves that you can make with or without thumb-holes!  The long-sleeve with thumb-holes is what really started making me think it would be a great yoga top too!  And heck, the tank style would be great for that too!  And all the styles are great in regular fabrics for just a regular top too!  There are just so many options with this!

For my version, I did the ruched ties with my same fabric, but during testing, I also saw people using ribbon for the ruched ties and I really liked that look too, so, yet another option! Lol!   And if you are concerned about the ruching being “too-much” – you can loosen or tighten it as much or as little as you’d like.  This is a top that can be truly made to your own taste!

https://www.ellieandmac.com/collections/juniors-womens-patterns/products/womens-ruched-tee-pattern/?aff=208

I did this version in double brushed poly, but really, you can use so many different fabrics.  I’m thinking I’ll do some tri-blend jersey ones for work-out….  and a sweater knit one would be amazing too!  I’m sure you’ll be seeing a few more of these from me! Lol!

Best of all – if you are reading this any time from today (when published) through Sunday, the pattern will be on sale for only $3.85 too!

https://www.ellieandmac.com/collections/juniors-womens-patterns/products/womens-ruched-tee-pattern/?aff=208

I’ll be sure to update when I do this in more fabric and option variations so you can see how it works with some different fabric bases, but I wanted to get this out right away while the pattern is on sale.

Hope you enjoyed the read today and here’s to hoping you have a Sewtastic Day!

general sewing · Pattern Tests · Uncategorized

Sinclair Jemma and Skylar – Great on-trend styles for the changing seasons!

This post may contain affiliate links.  These links in no way change how you would purchase items, the amount you pay, and I do not receive any of your personal information.  For paid purchases, the company themselves may pass along a very small percentage of the proceeds from the sale to me as a thank you for referring.  This really amounts to pennies per purchase, but those pennies do eventually add up and when they do, it helps me to continue purchasing patterns, fabrics, and supplies.  So to those of you that do utilize the affiliate links, please know that I truly do Thank You as you are helping me to continue doing what I love doing.

I was lucky enough to be able to test out 2 of the newly released patterns by Sinclair – the Jemma Knit Tunic and the Skylar Knit Raglan Hoodie:

https://sinclairpatterns.com/product/jemma-knit-tunic-with-pockets-and-collar-sewing-pattern-pdf/?tm=shellyt420

https://sinclairpatterns.com/product/skylar-knit-raglan-hoodie-pdf-sewing-pattern/?tm=shellyt420

First up, the Jemma Knit Tunic.  The pattern can be made with the pockets or without and just a hemmed style.  I did the pockets on both of my versions because – well, pockets! Lol!  I do want to revisit this pattern and just do a standard one with the hemmed bottom and no pockets though because I really like that look too.  The pattern itself features the great drafting you’d expect from the Sinclair Patterns – including separate files for petite, regular and tall in a nice size range.  Detailed and easy to follow instructions.  I will say that a complete beginner may have a little difficulty in that little v-neck style area where the collar meets because it’s easy for that particular little spot to end up bunching up right there, but if you’ve done any type of v-neck before, you’ll have no issues at all.  Other than that, it goes together rather quickly.  The buttons on it are optional and are completely decorational.  So, no button-holes if that was holding you back on purchasing it! Lol!

The floral version is done in double brushed poly.  The green version is done in a sweater knit – I’ll admit, the sweater knit was a little difficult to work with – but it’s nothing to do with the pattern – the particular fabric was a looser weave then I was expecting when I ordered it, but really wanted to try it out on this style top.  So, don’t shy away from using sweater knit for the pattern – I’d just suggest that you use one that isn’t too loose of a weave/flimsy.

For the Skylar Hoodie, it features a few different hood options.  I chose to do the standard cowl neck version for mine.

I love the fact that you can do all of these color-blocking things with it so you can maximize some of your fabrics by mixing and matching solids/prints or whatever you want.  I just went with what I had on hand at the time.  I had planned on solid purple sleeves, but didn’t have enough of the solid purple, so went with the print instead.  This was done in french terry and it’s so darn comfortable.

I did have a little issue with the front pocket panel pockets and a little puckering, but that’s more my fault than the pattern itself.  I was just having an off-day, wasn’t really understanding what was going on.  When I took some time away from it, came back with a clear head and really just sat down and went step-by-step with the instructions, I didn’t have any issue at all.  So, my best advice for this one is – read the step-by-step instructions.  I’d say for that portion, read through them fully first, then begin and just work step-by-step with the instructions.  Same for the thumb-hole cuff too.  If you do that, you are going to be perfectly fine.  I wouldn’t say this is something an absolute beginner should tackle though, but hey, if you are ambitious enough, then go for it – I just know personally, I’d get a little flustered if I didn’t have some understanding of construction before attempting it.

So, those are my thoughts on the 2 new patterns –  I do absolutely love them both and am so glad I had the opportunity to test them as they are things I will wear over and over again.  The only thing I do like to point out is that even with the very detailed directions and great drafting, a beginner may run in to some issues in a couple of spots on both patterns.  But, if you have a little sewing experience, I’d highly recommend both patterns!

https://sinclairpatterns.com/product/skylar-knit-raglan-hoodie-pdf-sewing-pattern/?tm=shellyt420

https://sinclairpatterns.com/product/jemma-knit-tunic-with-pockets-and-collar-sewing-pattern-pdf/?tm=shellyt420

Here’s to hoping you have a Sewtastic Day!   And if you attempt these patterns – have fun – you’ll love them!

general sewing · Uncategorized

From Vision to Reality – a Couple Patterns, a Little Time, and Some Fabric

This post may contain affiliate links.  These links in no way change how you would purchase items, the amount you pay, and I do not receive any of your personal information.  For paid purchases, the company themselves may pass along a very small percentage of the proceeds from the sale to me as a thank you for referring.  This really amounts to pennies per purchase, but those pennies do eventually add up and when they do, it helps me to continue purchasing patterns, fabrics, and supplies.  So to those of you that do utilize the affiliate links, please know that I truly do Thank You as you are helping me to continue doing what I love doing.

IMG_0306

It’s rainy, dreary, chilly weather here today.  So, I really wanted something cute but super comfy to be in.  Of course, I have tons of things I could have easily thrown on, but for some reason, I had a particular outfit in my head that I just couldn’t wait to try out, so instead of doing stuff I should have been doing this morning, I got to sewing instead… lol!  I’ll get that darn laundry done in a bit, I swear…..

I’m not sure why the outfit was stuck in my head, but I can say, I’ll be making several more now! Lol!  Especially since I haven’t put any of the patterns away yet, so it will be nice and easy to cut out some more instead of putting them away and having to pull them all back out again to do more later.

Each of the patterns I used to create this outfit are super quick and easy – so much so that you’ll probably find yourself doing just what I did – hurry up and sew the outfit quick first and then do the stuff that needs to be done! Lol!  You can blame me – I swear I don’t mind!

I’ll apologize right in the beginning for the bad pictures – I really wasn’t planning on doing a post about this outfit, but then kind of decided last minute it may be of interest to some to see a full completed outfit instead of just a pattern here or there.

First up – for the top, I used the Striped Swallow Hideaway Top pattern:

Hideaway PDF Pattern Women XS-XXXL

IMG_0306 (2)

The top has the drop shoulder which is easy to do, and is a faced style neckline so you don’t have to worry about any bands or anything like that.  You can do the regular short sleeves or it has a long sleeve cuff option too.

This was made in a sweater knit from Sincerely Rylee:

https://sincerelyrylee.com/?aff=391

The pants are done in my favorite and go-to leggings pattern:

https://sinclairpatterns.com/product/penny-leggings-pdf-sewing-pattern/?tm=shellyt420

I know there are several free leggings patterns out there, and I’ve used them – and actually still use one particular one because it’s the one my grandma prefers when I make leggings for her (which just happen to be literally the only pants she will wear are leggings I make for her), but personally, I like the fit of the Sinclair pattern way better for myself.

IMG_0306

Classic pull-on style legging with a contoured waistband.  These were done in cotton lycra fabric from Knitpop:

http://bit.ly/2lV0c4P

And lastly, I really wanted some comfy, slouchy boot style socks – and what can be better than having them match your top??!  Lol!!  The only patterns I’ve seen are fitted style socks (which I do make a lot of…. but this time I really wanted a slouchy sock instead).  I’m sure there may be some out there that I’m just not aware of, but I was able to easily modify the pattern I like the most to make them into my pictured slouchy sock instead.  I used this pattern:

https://www.peekaboopatternshop.com/cozy-toes-socks?aff=484

IMG_0306 (3)

I’ve made this pattern numerous times.  I know I’m a slim fit, but knowing that I wanted these to be slouchy rather than fitted, I went with my same foot size, but for the leg of the socks, I went with the regular fit instead of slim, did the knee-high length, and there we have it – a perfect slouchy sock that matches my top!  These were done in the same Sincerely Rylee sweater knit.

So, here’s the completed outfit that I’ll be wearing today:

IMG_0306

And if you are wanting to recreate any or all of the outfit, here are the easy link to what I used:

Top:

Hideaway PDF Pattern Women XS-XXXL

Pants:

https://sinclairpatterns.com/product/penny-leggings-pdf-sewing-pattern/?tm=shellyt420

Socks:

https://www.peekaboopatternshop.com/cozy-toes-socks?aff=484

Sweater Knit Fabric:

https://sincerelyrylee.com/?aff=391

Cotton Lycra Fabric:

http://bit.ly/2lV0c4P

Hopefully you enjoyed your read today and maybe it’s given you some ideas on making your own ideas come to life for your perfect outfits too!  Here’s to hoping you have a Sewtastic Day and don’t even have to look at a seam ripper once today!


general sewing · Pattern Tests · Uncategorized

Ellie & Mac Be Smart Jumper – You Are Gonna Want This Pattern!

IMG_0151 (2)

This post may contain affiliate links.  These links in no way change how you would purchase items, the amount you pay, and I do not receive any of your personal information.  For paid purchases, the company themselves may pass along a very small percentage of the proceeds from the sale to me as a thank you for referring.  This really amounts to pennies per purchase, but those pennies do eventually add up and when they do, it helps me to continue purchasing patterns, fabrics, and supplies.  So to those of you that do utilize the affiliate links, please know that I truly do Thank You as you are helping me to continue doing what I love doing.

I’ll be perfectly honest and say that when I signed up for the testing of the new Ellie & Mac Be Smart Jumper Pattern, I wasn’t completely sold on it being something that I would actually wear, but the style was so cute that I really wanted to give it a try to see how I’d like it.  I do think however that this pattern should come with a disclaimer or caution or something – like seriously, if you DO NOT want attention from your hubby (or significant other) that particular day, DO NOT wear this skirt!  I repeat – DO NOT wear this skirt then!  As you can guess, I make quite a few things….  and generally I get the standard comments from the hubby like – oh that’s nice, that’s a nice top…. etc.  I was wearing this outfit when he came home after I made it, and honest to goodness, a minimum of 4 times he said – wow, I REALLY like that skirt/dress thingy…  and he proceeded to touch it many times.  So, consider this your warning – this could warrant attention – although, if you are truly smart, you will definitely use that to your advantage to order more fabric…. like I did….  hey, he set himself up for it!  He actually said – you are going to be making more of those, right??!!  So, of course I took full advantage of the situation and said – oh, I will, but only when I order more fabric for them! Lol!!

Be Smart Jumper Pattern (adult)

So, on to the real reason you are here – to find out more about the pattern itself then what goes on in my household! Lol!  So, this pattern works up super quick!  The longest part is going to be the hemming.  It consists of a circle shirt, a waistband and your straps.  I’m talking done in less than an hour if you just sit down and work on it.  Super easy to follow instructions and minimal pieces.  This pattern is designed for knit fabrics only.

Be Smart Jumper Pattern (adult)

I made mine in double brushed poly, so it has a nice feel and flow.  I know others have done it in other knits like liverpool and such, so it works with heavier knits too.  I just had this print on-hand from So Sew English and decided to give it a try (remember – this was something I wasn’t positive I was going to like until I actually wore it – now I love it and will be making a couple of them!)

I did the high-waist version.  There is also a low waist version too.

Be Smart Jumper Pattern (adult)

Now, one of the dilemmas with something like this is – what in the world do I pair it with?  Well, if you want to copy me, I did the Ellie & Mac Be The Leader Top.  But with no ruffle.  I did hack a band for the top instead of doing the elastic.  This one is the shirt length with short sleeves and a hacked band across the top in a black double brushed poly that was from Knitpop –

http://bit.ly/2lV0c4P

If you don’t have the Ellie & Mac Be the Leader Top Pattern yet, it is one that I’d recommend – it goes together real quick and is so cute!

Be The Leader Top Pattern (adult)

And….  you may have noticed the matching fabric poking out of the boots….  yup – I made knee-high socks to match the jumper!  I used this pattern for the socks:

https://www.peekaboopatternshop.com/cozy-toes-socks?aff=484

So, if you are looking for a cute skirt pattern – and remember – you can even just make the skirt without the suspenders if you’d prefer too – I’d recommend checking out this new one by Ellie & Mac – it’s truly a hit in my house!  And if you want to copy my total look, go for it!  I’ve included all the patterns in the post so you can create the full outfit!

Be Smart Jumper Pattern (adult)

Hopefully you’ve enjoyed your read today and here’s to hoping you have a Sewtastic Day!